
 Não se esqueça de antes de começar salvar uma cópia de seu template, caso não dê certo, é só reinstalá-lo.
Vá até o HTML de seu blog e procure por:
</body>
Agora cole o código acima dele.
<div id='dock'>
<!-- Put your dock in this section -->
<div id='footer-columna-contenedor'>
<div id='footer1' style='width: 20%; float: left; margin:0; text-align: left;'>
<b:section class='footer-column' id='col1' preferred='yes' style='float:left;'/>
</div>
<div id='footer2' style='width: 20%; float: left; margin:0; text-align: left;'>
<b:section class='footer-column' id='col2' preferred='yes' style='float:left;'/>
</div>
<div id='footer3' style='width: 20%; float: right; margin:0; text-align: left;'>
<b:section class='footer-column' id='col3' preferred='yes' style='float:right;'/>
</div>
<div id='footer4' style='width: 20%; float: left; margin:0; text-align: left;'>
<b:section class='footer-column' id='col4' preferred='yes' style='float:left;'/>
</div>
<div id='footer5' style='width: 20%; float: left; margin:0; text-align: left;'>
<b:section class='footer-column' id='col5' preferred='yes' style='float:left;'/>
</div>
</div>
</div>
Agora encontre:
]]></b:skin>
E cole o próximo código abaixo dele.
(É recomendável que vc salve e depois hospede os dois scripts abaixo em um servidor para evitar problemas)
jqueryeasing.js
jqueryeasing.js
<script src='http://www.sigmirror.com/files/23924_ndaws/jquery.js' type='text/javascript'/>
<script src='http://www.sigmirror.com/files/23965_5kf1u/jqueryeasing.js' type='text/javascript'/>
<script>
//http://webtips.dan.info/graceful.html
$(document).ready(function() {
//Transition you want
var easing_type = 'easeOutBounce';
//The default height for the dock (on mouse out)
var default_dock_height = '20';
//Expanded height, the height of the dock on mouse over, you have to set it in CSS
var expanded_dock_height = $('#dock').height();
//Fake body height
var body_height = $(window).height() - default_dock_height;
//Set the size of #fake_body
$('#fake-body').height(body_height);
//Set the CSS attribute for #dock
$('#dock').css({'height': default_dock_height, 'position':'fixed', 'top': body_height});
//In case the user resize the browser, we will need to recalculate the height and top for #fake_body and #dock
$(window).resize(function () {
//Grab the updated height/top
updated_height = $(window).height() - default_dock_height;
//Set the updated height for #fake_body and top for #dock
$('#fake-body').height(updated_height);
$('#dock').css({'top': updated_height});
});
//The main event for the dock bottom menu
$('#dock').mouseover(function () {
//Recalculate expanded height (always get the latest height), in case user has resized the window
expanded_height = $(window).height() - expanded_dock_height;
//Animate the height change, set the height to expanded_dock_height and set the top value as well
$(this).animate({'height':expanded_dock_height,'top': expanded_height},{queue:false, duration:800, easing: easing_type});
}).mouseout(function () {
//Recalculate default body height (always get the latest height), in case user has resized the window
body_height = $(window).height() - default_dock_height;
//Animate the height change, set the height to default_dock-height and set the top value as well
$(this).animate({'height':default_dock_height,'top': body_height},{queue:false, duration:800, easing: easing_type});
});
});
</script>
<style type='text/css'>
<!--
#floatmenu{position:absolute; width: 220px; top: 10px; left: 10px; z-index:5; visibility:visible;}
-->
</style>
<script language='javascript'>
<!--
function FixMenuY(){
document.getElementById('floatmenu').style.top = document.body.scrollTop + 10;
}
setInterval("FixMenuY()",200);
theObjects = document.getElementsByTagName("object");
for (var i = 0; i < theObjects.length; i++) {
theObjects[i].outerHTML = theObjects[i].outerHTML;}
//-->
</script>
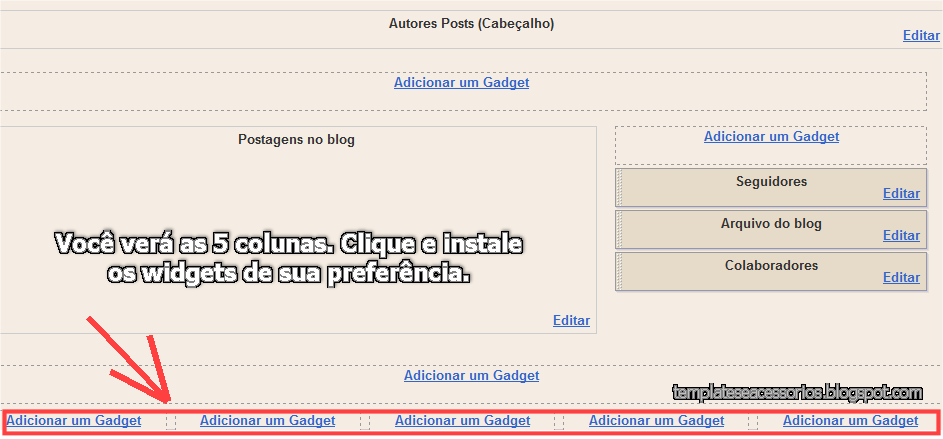
Muito bem, agora vamos dar estilo as 5 colunas. Você pode aumenta-las horizontalmente, modificar cores de fundo, de borda e do fundo do título.
Acima de ]]></b:skin> cole o código abaixo.
/*Footer expansivo-----------------------------*/
#fake-body {overflow:auto; z-index:1;}
#dock {
background:#000; /*cor de fundo*/
border-top: 3px solid #808080; /*cor da borda*/
height:300px;
z-index:100;
width:100%;
}
#footer-columna-contenedor {clear:both;}
.footer-columna {padding: 10px;}
#col1 .widget{height:240px;overflow:auto;}
#col1{
background:#fff;/*cor de fundo do widget*/
border: 2px solid #cc0000;/*cor da borda do widget*/
margin: 5px;padding: 5px;
word-wrap: break-word; /* fix for long text breaking sidebar float in IE */
overflow: hidden;/* fix for long non-text content breaking IE sidebar float */}
#col1 h2{
background: #ccc;/*cor de fundo do título*/
font-size: 16px;
text-align: center;
}
#col2 .widget{height:240px;overflow:auto;}
#col2{
background:#fff;/*cor de fundo do widget*/
border: 2px solid #cc0000;/*cor da borda do widget*/
margin: 5px;
padding: 5px;
word-wrap: break-word; /* fix for long text breaking sidebar float in IE */
overflow: hidden;/* fix for long non-text content breaking IE sidebar float */}
#col2 h2{
background: #ccc;/*cor de fundo do título*/
font-size: 16px;
text-align: center;
}
#col3 .widget{height:240px;overflow:auto;}
#col3{
background:#fff;/*cor de fundo do widget*/
border: 2px solid #cc0000;/*cor da borda do widget*/
margin: 5px;
padding: 5px;
word-wrap: break-word; /* fix for long text breaking sidebar float in IE */
overflow: hidden;/* fix for long non-text content breaking IE sidebar float */}
#col3 h2 {
background: #ccc;/*cor de fundo do título*/
font-size: 16px;
text-align: center;
}
#col4 .widget{height:240px;overflow:auto;}
#col4{
background:#fff;/*cor de fundo do widget*/
border: 2px solid #cc0000;/*cor da borda do widget*/
margin: 5px;
padding: 5px;
word-wrap: break-word; /* fix for long text breaking sidebar float in IE */
overflow: hidden;/* fix for long non-text content breaking IE sidebar float */}
#col4 h2{background: #ccc; font-size: 16px; text-align: center;}
#col5 .widget{height:240px;overflow:auto;}
#col5{
background:#fff;/*cor de fundo do widget*/
border: 2px solid #cc0000;/*cor da borda do widget*/
margin: 5px;
padding: 5px;
word-wrap: break-word; /* fix for long text breaking sidebar float in IE */
overflow: hidden;/* fix for long non-text content breaking IE sidebar float */}
#col5 h2{
background: #ccc; /*cor de fundo do título*/
font-size: 16px;
text-align: center;
}
Pronto, as colunas estão instaladas. Vá até "Elemento de página" clique sobre "Adicionar um widget" e escolha o que colocar.


Olá que lindo está por aqui, ainda não tinha visto esta cor, hehe
ResponderExcluirSempre inovando hein? Interessante estas colunas escondidas, achei super
beijos
OLÁ
ResponderExcluirElke
Há tempos estava querendo aprender isto,
deu certo
em
http://bbbuggg.blogspot.com/
obrigada
grande
amiga
sabe tudo
;)
Elke
ResponderExcluire se a gente
quiser fazer no topo,
é como?
Oi Edilene, tudo bem ? Vou verificar agora. Beijos.
ResponderExcluirBom Edilene, testei e não deu certo...Mas também não testei o script em si. Beijos
ResponderExcluirMimo, obrigada mas sabe, já estou quase mudando de novo, colocando um template liquido. É bom com essa quantidade de monitores enormes que temos hoje em dia. Beijos
ResponderExcluirOI
ResponderExcluirELKE
Num entendi direito sobre o q dissestes:
"já estou quase mudando de novo, colocando um template liquido. É bom com essa quantidade de monitores enormes que temos hoje em dia"
Poderia me ajudar a entender
rss
bjus
linda
No meu ele não centraliza. tem alguma dica?
ResponderExcluirOi Elke di Barros tem como colocar imagen no cima das colunas para ficar igual as outras aguardo a resposta :)
ResponderExcluirOlá, tentei fazer mais os scripts devem estarem quebrados. bjao!
ResponderExcluirOLá, gostaria de saber, como colocar o rodapé automatico, só aumenta se o gadget for maior, para se enquadrar ao gadget, e não ter um tamanho fixo... poderia ajudar? beijos
ResponderExcluir